File Setup Guide
Creating a Print-Ready Artwork File
This guide is intended to assist with best practices when setting up and exporting your artwork file so it is print-ready for Cornerstone print production.
Before uploading artwork to Cornerstone for printing, your provided file should be print-ready.
For Cornerstone purposes, print-ready artwork includes the following criteria:
- A high quality PDF file (at least 300 dpi).
- Includes sufficient Bleed past the trim line of any background or graphic element in your design that flows off the page.
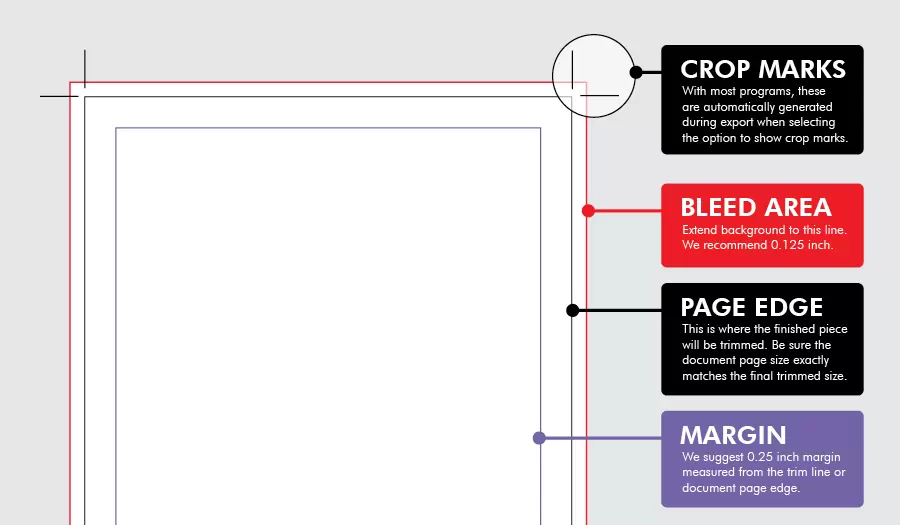
- Includes Crop Marks (or trim marks) showing where to trim.
- The dimensions measured inside the crop marks match the size of what is being ordered.
- Includes only 1 printed / trimmed piece per page. (Do not put multiple trimmed pieces on one page.)
Artwork that is not print-ready will potentially require a Cornerstone in-house graphic designer to modify the file so it is ready for printing. This service is provided at an hourly rate of $90 per hour.
By supplying a print-ready artwork file, you will avoid any possible misunderstandings about final trim size, quantity and artwork cropping. Also, you will avoid any production delays and any extra artist fees associated with re-setup of your file. In some cases, a provided print-ready file will print better than one that needs modifications. This is because the in-house graphic designer modifying the artwork will not have access to the original design pieces and the original artwork file.
STEP 1 – CHOOSING YOUR SOFTWARE
Adobe Creative Cloud applications are the industry standard for professional graphic design and printing. Therefore, Cornerstone provides InDesign and Illustrator blank template files to assist you with quick file setup for many of our products. If you have InDesign or Illustrator, using our provided blank template can ensure your file is setup correctly. When available, these files are located under the Template Files tab on each product’s page or you can find all our blank template files here.
When using Cornerstone blank templates:
- Be sure to select the template size that matches the final size of the piece you wish to receive.
- Export your file with specific settings for Cornerstone production (see step 5).
Other software considerations
When considering using any software application to prepare your artwork for print, the following is a list of options and settings that should be available in your application so you can create a print-ready file.
- Configure a custom page size
- Configure bleed size
- Export your artwork to a PDF
- Show trim marks and bleed on the final, exported PDF file.
Also, when working with photographic / raster artwork, you should be able to control the dpi resolution (dots per inch) of your final file. More about these topics are explained in detail below.
When using Canva, please refer to this tutorial to learn how to configure page size, bleed size, trim marks and export to PDF.
STEP 2 – SETTING UP YOUR DOCUMENT
Setting the Document Page Size
In your software program, create a new document with a page size to be the exact same size as the finished, printed piece you expect to receive.
If the page size that doesn't match the final print size, your artwork will most likely be set up to an incorrect aspect ratio. As a result, some of your designed elements may fall off the page when the piece is trimmed down. Also, this can result in incorrect, lower DPI resolution and your artwork will not print as sharp.
| CORRECT | INCORRECT | |||||||||||||||
Print Size Needed: 5 x 7 inches | Print Size Needed: 8 ½ x 11 inches | |||||||||||||||
|
|
Setting the Bleed Area (1/8-inch or 0.125")
When setting up your document page size, most design applications will allow you to configure the bleed area in the same dialog box. Set this to at least 0.125 inch around all sides of your document. When configured, this will show as a small amount of extra area beyond the document page size edge.
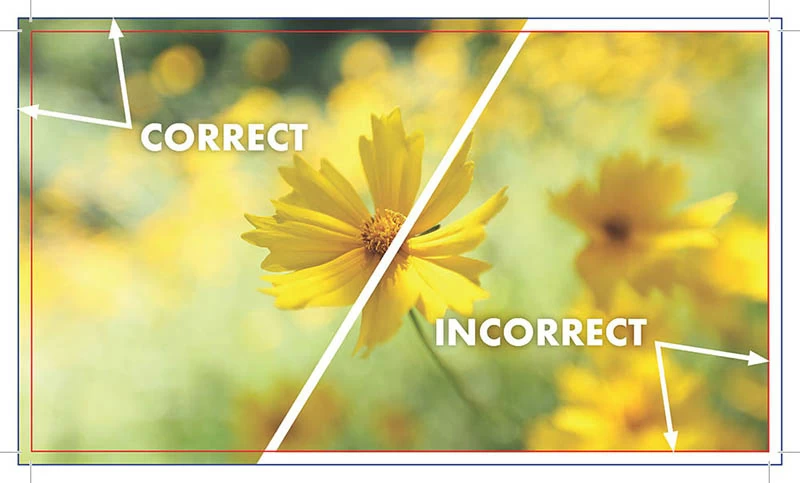
In most cases, your artwork will be printed on a larger sheet and then trimmed down to size. Bleed is required in your design to achieve a clean, professional cut with no unimaged paper edges showing after your piece is trimmed to the final size.
When you are creating your design, pay close attention to where background images/colors end on your page. Be sure to extend any background image or background color past the edge of the document page boundry and into the bleed area.
Also, if there are any objects / elements that you want to print to the very edges of the finished product: a line, photo, illustration, background, etc. that will “run off the edge” of the paper, these items should be positioned so the element flows past the page edge into the bleed area as well.
Below shows 'correct' and 'incorrect' examples of designing with bleed. The trim size is represented by a red line. The bleed area is the zone that extends past the page edge. On the side that is represented as 'correct', notice how the image extends past the red, trim line.
We recommend a bleed area of 0.125 inch (⅛ inch) past the document edge on all 4 sides.
Setting Margins (Safe Area)
Margin is the space inside of the document edges creating a “Safe Area”. Keep text and important imagery within this zone to ensure it isn't in danger of being cut off or cut into during trimming. Additionally, it is generally more aesthetically pleasing to allow extra room around the edge of your page.
We recommended a margin of at least .25 inch (¼ inch) margin. Many designers prefer .5" (½ inch) margins for a more pleasing layout.
STEP 3 – USE OF HIGH-RESOLUTION IMAGES OR VECTOR ART
Image Resolution: All photos and raster art should be at least 300 DPI to ensure they print clearly. Lower quality images may appear blurry and pixelated when printed. Images from a website are often low quality and not designed for print.
Raster Art: Raster artwork is composed of millions of pixels in various colors and shades, therefore these file types will degrade when scaled up in size. The more they are enlarged, the less sharp the image will appear when printed. Raster artwork is created and edited in software programs such as Photoshop, Corel Painter and PaintShop Pro. Typical raster file types are .psd, .tif, .jpg or .gif file formats.
Vector Art: Composed from a series of shapes, lines and fill colors, vector artwork can be scaled infinitely without image degredation. Text created and saved as a vector file is preferred, especially when producing signs and banners. Common vector illustration software programs include Adobe Illustrator or Corel Draw. Typical vector file types are .svg, .eps, .pdf or .ai file formats.
STEP 4 – OTHER CONSIDERATIONS
If all the above steps were followed carefully your artwork should be ready. Prior to uploading your art files to be printed there are just a few things to consider making sure that your design prints as intended.
Spell Check: Professional design programs have a built-in spell check capability, but they are not infallible. In addition to spelling consider grammar and punctuation, and certainly your phone numbers, address and other information that the spell check program is unable to help with. It is always a good idea to have one or more additional people examine your document for errors you may have overlooked.
Double Check Images: Make sure all images and special effects are high resolution.
Bleed and Margins: Confirm that bleed and margin areas are ample.
Bindery: Note the position of any bindery functions (such as folding or hole-punching) and how they will interact with the placement of your designs.
STEP 5 – EXPORT TO PDF
Since there are many different software packages and file formats that can be used to create artwork, it is very important that you export your file as a PDF. This will embed all the document fonts and images we need to print your document. A PDF file helps us see exactly what you have intended for the final printed piece.
You final PDF should be a High Quality Print (@ 300 dpi). The file should include Crop Marks and Bleed Area. When exporting your PDF, be sure these items are configured properly so they show in the final file.
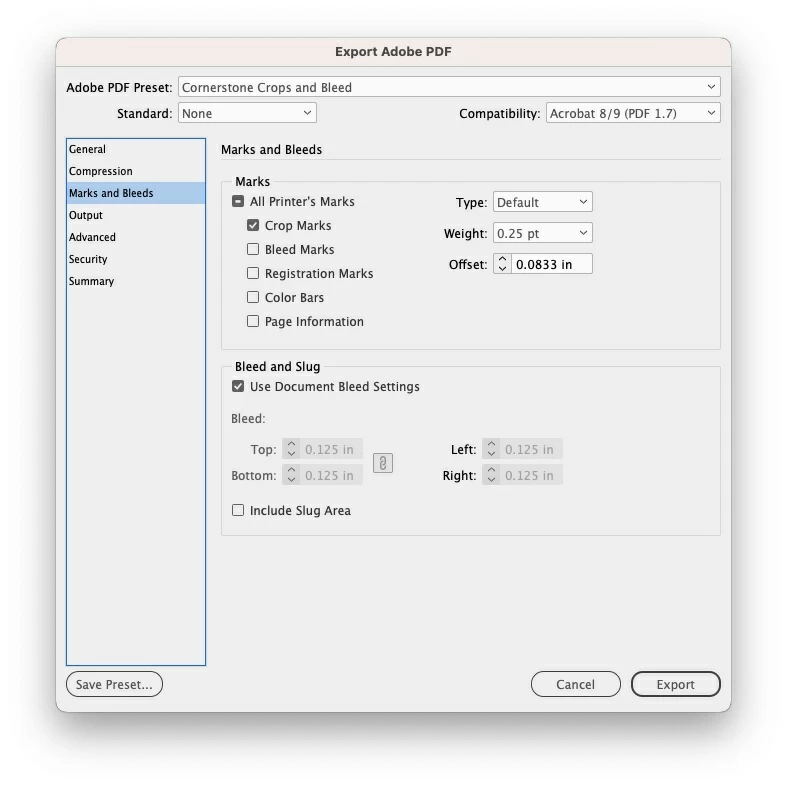
Below are correct export settings when using Adobe InDesign. The export dialog box will be similar in other Adobe products. Select High Quality Print from the standard presets and then be sure to tick checkmarks next to Crop Marks and Use Document Bleed Settings as shown below.
When using Canva, please refer to this tutorial for showing crop marks and bleed in your final, exported file.
The result file should resemble something like the below example:
 |
Important: Do not upload artwork that has been set up with more than one piece per document page. We have a unique system for stepping up your artwork on larger sheets for output. The sheet size depends on many factors and the price of our products includes this service.
Still Need Help? Contact Us between 8:00am - 4:30pm (CT)
BURNSVILLE LOCATION
13775 Frontier Court
Burnsville, MN 55337
☎ 952.891.8700